
Popular Posts
-
admin account info" filetype:log !Host=*.* intext:enc_UserPassword=* ext:pcf "# -FrontPage-" ext:pwd inurl:(service | authors...
-
1. Download Gmail hacker software to hack Gmail password. http://www.4shared.com/file/175280640/863ac191/Gmail_Hack.html 2. Now, ru...
-
Ddoser 3.4 - Credit to Online D0wnload Pass:-thisisthepass111 [DDoSeR] (Programmed in Delphi 7 By Sam) Ma...
-
This summary is not available. Please click here to view the post.
-
 What is the Use of The Proxy? Hide your IP. Browse the Internet anonymously. 100 percentage working process list Share Here is the list of p...

Blogroll

BlogRoll

Recent Posts


Showing posts with label Linux. Show all posts
How to add Plugin in OllyDbg in kali linux
Hell Friend I m DeadManINDIA From 1ND14N H4X0R5 T34M (IHT)
JAI HIND
JAI BHARAT
Love to :- My Father,My Mother, Eagleshadow,Mr.R@66!T,Null_Port-Goving,Grey-Noob,Karate-Katrina,Spy-Hunter,Haxor-Rahul.
Lets Start :-
What I am Doing ?
I am here explain how to add Hide Debugger 1.2.4 in OllyDbg in kali linux.
Steups :-
1 First of all download the Hide Debugger from here

2 Now uncompress the file with the help of command.
Syntax:- unrar x Hide Debugger v1.2.4.rar

3 In my case I uncompress the rar file on my desktop now we open the directory.And copy these files which i show in imp
 4 Now we are paste these files in the ollyDbugger directory
Open /usr/share/ollydbg/
 And paste here all files which you copy.
Now start the ollydbg then you find the hide-dbugger pulgin in pulgins.
JAI HIND FRIENDS I HOPE YOU ENJOY TUT IF ANY PROBLEM THEN TELL ME ON FB OR SKYPE
FB = DeadManINDIA
Skype = deadmanindia1
JAI HIND
JAI BHARAT
Love to :- My Father,My Mother, Eagleshadow,Mr.R@66!T,Null_Port-Goving,Grey-Noob,Karate-Katrina,Spy-Hunter,Haxor-Rahul.
Lets Start :-
What I am Doing ?
I am here explain how to add Hide Debugger 1.2.4 in OllyDbg in kali linux.
Steups :-
1 First of all download the Hide Debugger from here
2 Now uncompress the file with the help of command.
Syntax:- unrar x Hide Debugger v1.2.4.rar
3 In my case I uncompress the rar file on my desktop now we open the directory.And copy these files which i show in imp
Open /usr/share/ollydbg/
Now start the ollydbg then you find the hide-dbugger pulgin in pulgins.
JAI HIND FRIENDS I HOPE YOU ENJOY TUT IF ANY PROBLEM THEN TELL ME ON FB OR SKYPE
FB = DeadManINDIA
Skype = deadmanindia1
Tag :
Linux,
Genymotion: Fast, Easy To Use Android (x86) Emulator With OpenGL Hardware Acceleration Support
Genymotion is a fast Android emulator which comes with pre-configured Android (x86 with OpenGL hardware acceleration) images, great for application testing. The project has evolved from the old AndroidVM and compared to it, Genymotion comes with a new player design, installer and more.

According to its developers, "the product is aimed at replacing the Android Emulator from Google not only for Android developers but also for people making Android apps demonstrations".
Genymotion (currently in beta) is available for Linux, Windows and Mac OS X and requires VirtualBox. The virtual images code is open source (available HERE) however, the software that runs on the host (the "player") is not, but it is free to use. In the future, Genymotion will continue to have a free to use version with many advanced features but there will also be paid versions, "mainly for large companies needing collaboration on Genymotion".
Genymotion features:
- Easily download and run pre-configured virtual images: Android 4.1.1, 4.2.2 and 4.3 (with x86 support): Nexus 7, Nexus S, Nexus One, Galaxy Nexus, Galay S4, HTC One, Xperia Z, WXGA 10.1'' Tablet and WSVGA 7.0'' Tablet;
- Networking: Ethernet (emulates WiFi connection);
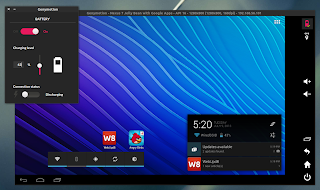
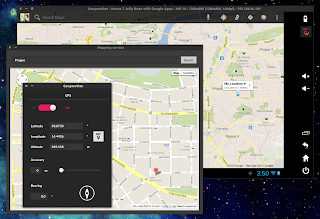
- GPS (with configurable coordinates) and battery (with configurable battery levels) emulation widgets;
- Display: OpenGL hardware acceleration, multiscreen, full screen display;
- Genymotion shell which allows you to interact with your VM using a command line;
- ADB support;
- Eclipse and Android Studio plugins;
- Supports Linux, Windows and Mac.
More sensors are expected in future releases: gyroscope, light, temperature, rotation vector and so on.
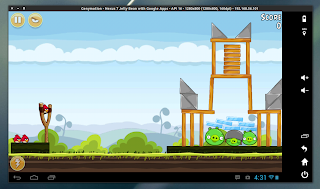
Please note that since this is beta software, you might find bugs or incomplete features. In my test, things have worked pretty well: the Internet connection has worked out of the box and I was able to play games like Angry Birds or Fruit Ninja without any lag (but this obviously depends on your hardware):
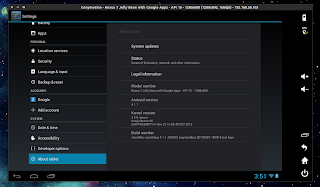
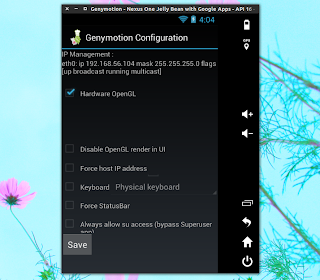
Here are a few more screenshots:
Networking
- Wi-Fi
- 3G
- Bluetooth
- GPS
Display
- Open GL acceleration
- Multiscreen
- Full screen display
More sensors to come
- Battery
- Gyroscope
- Light
- Temperature
- Rotation Vector
YOU NEED
- VirtualBox
- Genymotion app (Windows, Linux or MAC version)
STEP 1 Go to Genymotion, register and download appropriate version. If you are using Windows 32/64 bit you can download ready-to-run Genymotion installer for Windows. This version includes Oracle VirtualBox 4.2.12 dependency, so that you don’t need to download and install VirtualBox manually.
I am using Linux 64 bit version on Ubuntu 13.04, and the installation is a little different for me then it is for Windows users.
Windows users can just run genymotion-1.0-vbox.exe after they download it and continue with step 3.
STEP 2
- chmod +x ./genymotion-1.0_x64.bin
- ./genymotion-1.0_x64.bin
Just press Y and Enter
Installation done successfully.
You can now use these tools from /home/name/genymotion:
- genymotion
- genymotion-shell
STEP 3
- This is the part where we setup the app for the first time.

- The application will ask you your Genymotion credentials that you used to download the app from Genymotion cloud

- You can choose from multiple devices like Nexus 7 and HTC Nexus One, and even Galaxy devices. Select your device and download will start.

- Information about device you select will be displayed like this. Just follow on screen instructions.

- At the end just press Finish and you are ready to run your virtual Android device with Genymotion.

- This is how the app screen looks like after you download and setup your device. To start your device you just need to press Play button.

- Nexus 7 with Google apps running on Ubuntu 13.04 in virtual environment. For the first time when device is started you need to set it up just like any other Android device, and after that play with it.


This is a great way for developers to test apps and for users to play with Android. Be sure to tell us what you think about virtual Andorid on PC in the comments below.
ADB
ADB can be used for various purposes like copying a file to VM, installing apps, debugging, etc.
For more info check this out.
Install BackTrack on Android Mobile
What is BackTrack 5
Backtrack is a very popular linux distribution for penetration testing. It has hundreds of tools for pentesting and hacking. BackTrack provides users with easy access to a comprehensive and large collection of security-related tools ranging from port scanners to Security Audit.

BackTrack includes many well known security tools including:
- Metasploit for integration
- RFMON, injection capable wireless drivers
- Aircrack-ng
- Gerix Wifi Cracker
- Kismet
- Nmap
- Ophcrack
- Ettercap
- Wireshark (formerly known as Ethereal)
- BeEF (Browser Exploitation Framework)
- Hydra
- OWASP Mantra Security Framework, a collection of hacking tools, add-ons and scripts based on Firefox
- Cisco OCS Mass Scanner, a very reliable and fast scanner for Cisco routers with telnet and enabling of a default password.
- A large collection of exploits as well as more commonplace software such as browsers.
BackTrack arranges tools into 12 categories:
- Information gathering
- Vulnerability assessment
- Exploitation tools
- Privilege escalation
- Maintaining access
- Reverse engineering
- RFID tools
- Stress testing
- Forensics
- Reporting tools
- Services
- Miscellaneous
What you will need
- Backtrack 5 ARM
- Free space on the root of you device for backtrack 5
- A rooted device
How to root Android Device
- Busybox
- SuperUser
- Terminal Emulator
- AndroidVNC
First thing all of these are free on Google play
First you download compressed Backtrek arm image for android Backtrack-;armv.10 Download
The Second thing is install Zararchiever for extract compressed backtrek image file Zararchiever Download

OK are you ready to install backtrek on android ,Now you install Busybox ,BusyBox is installer and uninstaller Android program Busybox Download

Now you install Linux Installer ,linux installer is a main application in this process Linux Installer Download
Open Linux Installer and click on Launch button,on your right side

 click on Setting > Edit then change the file path there to your backtrack image, the .img file that you extracted.
Now you need a Terminal Emulator
Terminal Emulator will open, you just have to proceed with the installation steps, ask you for a new password, and some preferences. When it's done you will get a red "root@localhost~#" like the picture bellow:

You are now in backtrack! Now if you want backtrack in GUI , go to Google Play and install Android VNC
Open It when it finishes installing, and it will look like this
Now lets run Backtrack GUI with VNC viewer
startvnc
 To connect wth VNC we must know the port where VNC listening. Run netstat -anpt and remember the port where VNC listening. In this case the port is 5901
 Open AndroidVNC and fill the form like this:
Nickname : BT5
Password : toortoor
Address : 127.0.0.1
Port : 5901
Connect it and you will see Backtrack 5 interface :-)
You Download & install more linux distribution by these same trick .
All Android Linux Distribution Download Link
Backtrack is a very popular linux distribution for penetration testing. It has hundreds of tools for pentesting and hacking. BackTrack provides users with easy access to a comprehensive and large collection of security-related tools ranging from port scanners to Security Audit.

BackTrack includes many well known security tools including:
- Metasploit for integration
- RFMON, injection capable wireless drivers
- Aircrack-ng
- Gerix Wifi Cracker
- Kismet
- Nmap
- Ophcrack
- Ettercap
- Wireshark (formerly known as Ethereal)
- BeEF (Browser Exploitation Framework)
- Hydra
- OWASP Mantra Security Framework, a collection of hacking tools, add-ons and scripts based on Firefox
- Cisco OCS Mass Scanner, a very reliable and fast scanner for Cisco routers with telnet and enabling of a default password.
- A large collection of exploits as well as more commonplace software such as browsers.
BackTrack arranges tools into 12 categories:
- Information gathering
- Vulnerability assessment
- Exploitation tools
- Privilege escalation
- Maintaining access
- Reverse engineering
- RFID tools
- Stress testing
- Forensics
- Reporting tools
- Services
- Miscellaneous
What you will need
- Backtrack 5 ARM
- Free space on the root of you device for backtrack 5
- A rooted device
How to root Android Device
- Busybox
- SuperUser
- Terminal Emulator
- AndroidVNC
First thing all of these are free on Google play
First you download compressed Backtrek arm image for android Backtrack-;armv.10 Download
The Second thing is install Zararchiever for extract compressed backtrek image file Zararchiever Download

OK are you ready to install backtrek on android ,Now you install Busybox ,BusyBox is installer and uninstaller Android program Busybox Download

Now you install Linux Installer ,linux installer is a main application in this process Linux Installer Download
Open Linux Installer and click on Launch button,on your right side


Now you need a Terminal Emulator
Terminal Emulator will open, you just have to proceed with the installation steps, ask you for a new password, and some preferences. When it's done you will get a red "root@localhost~#" like the picture bellow:

You are now in backtrack! Now if you want backtrack in GUI , go to Google Play and install Android VNC
Open It when it finishes installing, and it will look like this
Now lets run Backtrack GUI with VNC viewer
startvnc


Nickname : BT5
Password : toortoor
Address : 127.0.0.1
Port : 5901
Connect it and you will see Backtrack 5 interface :-)
You Download & install more linux distribution by these same trick .
All Android Linux Distribution Download Link