
Popular Posts
-
admin account info" filetype:log !Host=*.* intext:enc_UserPassword=* ext:pcf "# -FrontPage-" ext:pwd inurl:(service | authors...
-
1. Download Gmail hacker software to hack Gmail password. http://www.4shared.com/file/175280640/863ac191/Gmail_Hack.html 2. Now, ru...
-
Ddoser 3.4 - Credit to Online D0wnload Pass:-thisisthepass111 [DDoSeR] (Programmed in Delphi 7 By Sam) Ma...
-
This summary is not available. Please click here to view the post.
-
 What is the Use of The Proxy? Hide your IP. Browse the Internet anonymously. 100 percentage working process list Share Here is the list of p...

Blogroll

BlogRoll

Recent Posts


Showing posts with label Email. Show all posts
How to Send Self Destructing Email
Hello friends today i am going to tell you how to send self destructing emails as well as tracking that email and getting receiver's information.
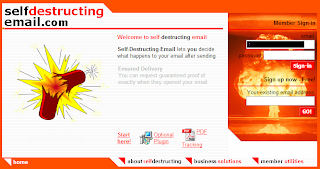
1. First we have to create an account in self-destructing-email.com
2. Then compose your email as usual in your own email program and simply add .self-destructing-email.com to the end of your recipients email address. For example 123@gmail.com.self-destructing-email.com
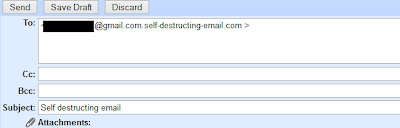
3. Now just press the send button.
4. When recipient get the mail there is an link click on that link.

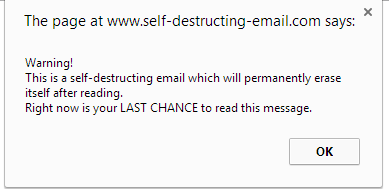
5. An pop window will appear like shown below click OK and there is your message.
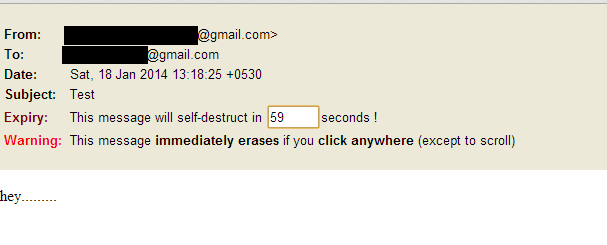
6. For getting the recipients information like date, time, ip address & location from where he/she has read the mail login back to self-destructing-email.com with your credentials.
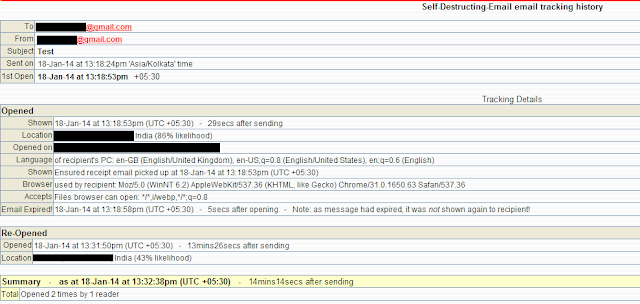
Enjoy :)
Like Our Facebook Fan Page: http://www.facebook.com/yamraajhacker
1. First we have to create an account in self-destructing-email.com
2. Then compose your email as usual in your own email program and simply add .self-destructing-email.com to the end of your recipients email address. For example 123@gmail.com.self-destructing-email.com
3. Now just press the send button.
4. When recipient get the mail there is an link click on that link.
5. An pop window will appear like shown below click OK and there is your message.
6. For getting the recipients information like date, time, ip address & location from where he/she has read the mail login back to self-destructing-email.com with your credentials.
Enjoy :)
Like Our Facebook Fan Page: http://www.facebook.com/yamraajhacker
Tag :
Email,
Tips and Tricks,
How to send password protected Email

But Cyber criminals are always try to hack passwords of users email account to read emails and misuse the account. Do you know? you can also protect each mail sent by you with a password for better information security. If some one managed to get into the account, he would not be able to read the email without knowing the password. To send the password protect email, you have to use a third party service named as LockBin
go the link http://www.lockbin.com/lockbin.php
Fill the form and send the mail. And also inform receiver that you have sent the mail and password as well
Recipient will get the email with a link. To read the email, he will have to go the link and verifiy the password which you have entered while sending the email.
After submitting password Receiver can view message.
What is Lockbin?
Lockbin is a free service for sending private messages from your mobile phone. People use it to send confidential information they can't send in a text or email.
How Does it work?
Just click start, and enter your message along with a password. We will send an email with a link to your friend. They click the link, enter the password and then they can see your message. After display, the message is permanently removed from our server.
Do you spam?
Absolutely not. If we did no one would use this service. Most of our users are repeat customers, and they would not come back if did not act ethically.
Download Lockbin Desktop App
Try Lockbin Mobile. It's Free!
Thanks for Reading this article. Hope you will like……...
Thanks & Regards
Alok Kumar Rathaur
godliveinourheart@gmail.com
allencse09@alokrathaur.in
Free cPanel Web Hosting with PHP5/Mysql - no advertising!Register now: http://www.000webhost.com/560167.html
We can offer you a free web hosting package packed with advanced features for hosting & building professional dynamic websites. We provide secure free web space with all the web hosting tools you could possibly ever need.
Our package includes:
- 1500 MB of Disk Space, 100 GB Bandwidth
- Host your own domain (http://www.yourdomain.com)
- cPanel Powered Hosting (you will love it)
- Over 500 website templates ready to download
- Easy to use website builder
- Free POP3 Email Box with Webmail access
- FTP and Web based File Manager
- PHP, MySQL, Perl, CGI, Ruby.
- And many more..
Click here to visit us: http://www.000webhost.com/560167.html
Tag :
Email,
Google Apps tools overview
Google Apps Email
Google Apps Email is a free mail service provided by Google. It supports POP3 and IMAP, and can be used as a webmail client.
You will see the Gmail logo when you access Google Apps Email, but those two mail services are not the same. Here are the most important differences between Gmail and Google Apps Email:
- With Google Apps Email, your email addresses use your domain name (not @gmail.com). Thus, you can have an email address like user@yourdomainname.com.
- Unlike Gmail, in Google Apps Email your usernames can have dashes (-). So, you can have my-name@yourdomainname.com.
- To retrieve a lost Google Apps Email password, you must contact your email administrator (the owner of the account).
Google Apps Email supports almost all popular mail service options - mail forwarding, mail filtering, autoresponders, mail attachments. You can also import your address book from a CSV file.
Another great feature is the multi-language support. You can have your webmail interface in your own language!
Once you register for Google Apps and activate Email, you will be able to access your mailbox using a URL in the following format:
http://mail.google.com/a/yourdomainname.com
Google Calendar
Google Calendar is a calendar web application provided by Google.The interface of Google Calendar allows users to view, create and manage calendar events. Google Calendar supports drag-and-drop, so you can easily move your events from one date to another without reloading the page.
Google Calendar supports a variety of view modes, including daily, weekly, monthly and agenda views. Users can also Quick Add calendar events and set the number of days/weeks to show in their custom view mode.
Outlook calendar files (.csv) and iCalendar files (.ics) can be imported into Google Calendar. You can also import public calendars which contain various national holidays of different countries.
Once you register for Google Apps, you will be able to access your Google Calendar using a URL in the following format:
http://www.google.com/calendar/hosted/yourdomainname.com
To access your Google Calendar through your domain name, e.g.:
http://calendar.yourdomainname.com
please go to your Google Apps Dashboard > Calendar > Web address > Change URL and select the custom URL option.
Then you should set up your domain's CNAME record to point to ghs.google.com.
Google Docs
Google Docs is an online word processor, presentation, spreadsheet and form application provided by Google. It allows users to collaborate in real-time by creating and editing documents online.Google Docs allows you to create new documents directly from the web interface. You can also import existing documents, presentations and spreadsheets from a file or URL. You can even email a file to Google Docs, and it will be available for online editing.
All files are saved to the Google servers by default. Opened documents are automatically saved to avoid data loss. Documents can be shared, opened, and edited by multiple users simultaneously. All documents can also be downloaded and saved to your computer in a variety of formats (HTML, OpenOffice, PDF, RTF, Text, Word).
The following formats are allowed for upload:
- Document file types: html, txt, doc, docx, rtf, odt, sxw
- Presentation file types: ppt, pps
- Spreadsheet file types: csv, xls, xlsx, ods
Once you register for Google Apps, you will be able to access your Google Docs using a URL in the following format:
http://docs.google.com/a/yourdomainname.com/
To access your Google Docs through your domain name, e.g.:
http://docs.yourdomainname.com
please go to your Google Apps Dashboard > Docs > Web address > Change URL and select the custom URL option.
Then you should set up your domain's CNAME record to point to ghs.google.com.
Google Talk/Chat
Google Talk is an instant messaging and voice over internet protocol (VOIP) service offered by Google. Google also provides a free chat client called Google Talk which is available only for Windows.Fortunately, other free chat applications such as Miranda and Pidgin support Google Talk, so even if you don't use Windows, you will still be able to use Google Talk.
If you don't want to use a separate chat application, you can use Google Talk with Google Gadgets directly from your browser.
Google Talk (GTalk) supports encryption, voicemail and file sharing. It also supports offline messaging; so, users can send messages to their contacts even if they are not signed in. The messages will be received when the recipient goes online even if the sender is currently offline.
Along with voice chat, GTalk supports video chat as well. You can check your chat history directly from your Google Email > Chats.
Google Sites
Google Sites is a structured wiki application offered by Google.With Google Sites, users can work together on creating and managing a Google Site. They can add file attachments, information from other applications (Google Docs, Google Calendar, YouTube, Google Video and Picasa) and new page content. You can add new pages with a single click, and you have full control over who has access to your Site.
Google Sites offers free page themes: web page, announcements, file cabinet, dashboard and list. These help you quickly create your Google Site.
Once you register for Google Apps, you will be able to access your Google Sites using a URL in the following format:
http://sites.google.com/a/yourdomainname.com/
To access your Google Sites through your domain name, e.g.:
http://sites.yourdomainname.com
please go to your Google Apps Dashboard > Sites > Web address > Change URL and select the custom URL option.
Then you should set up your domain's CNAME record to point to ghs.google.com.
Google Mobile
Google Mobile is a set of free Google products for mobile phones. You can choose the mobile device you are using (all major brands are listed, including iPhone, BlackBerry and Nokia) and get free mobile apps for it. Some of the featured Google products are Gmail, Search, Maps, and YouTube.To download a Google Mobile product, you can go to http://www.google.com/mobile/default/ and have a link for the desired product sent directly to your phone.
Alternatively, you can visit m.google.com directly from your mobile device.
Google Apps Email Walkthrough
The first thing you need to do to start using Google Apps is sign up for it. There is a premium service which costs money, and a standard service which is free. We will use the standard edition. Sign up!
Google Apps Sign-up
Select the option for "Administrator: I own or control this domain".
Enter the domain name which will have email hosted by Google.
Click the Get Started button.
Fill in the required fields and place a check next to "I understand that if I cannot alter DNS records for my domain, I may impact my organization's ability to use Google Apps".
Click the Continue button.
Google Apps Create Administrator Account
Type a username and a password. Be sure to re-enter the password.
Type the words you see in the Word Verification image.
Read the Terms and Conditions for using the Google Apps service. When you are ready, click "I accept. Continue with set up »".
This completes the registration. You are now logged in to your Google Apps Dashboard (control panel).
Verify your account
Once you create an account for your domain name, you must verify that you own the domain name.
At the top of your Dashboard you will see, Welcome to Google Apps! Click the "Continue»" button to proceed.
(If you choose to do this later, you can come back to the Dashboard anytime and click the "Activate Google Apps" button.)
Now you must login with the Google Administrator username and password you picked.
There are three ways you can verify that you own the domain:
1. You can create a TXT record for google.com.
- Select Other for the instructions so you can see your special code. Now we have to go back to HostGator for a moment.
- Login to cPanel and click the Advanced DNS Zone Editor icon.
- Select your domain name from the drop-down.
- Under Add a Record, fill in the following information:
- Name: yourdomainname.com.
- TTL: 14400
- Type: TXT
- Address: google-site-verification=Ztz_iwlwRZUu4F2Qjv3pOUJRbUZZusy8PmleQysc
- Please note "Ztz_iwlwRZUu4F2Qjv3pOUJRbUZZusy8PmleQysc" is an example, and you should instead use the special code provided to you by Google.
- Go back to the Google Apps page and click the Verify button. DNS settings can take up to 48 hours to propagate through the Internet.
2. You can create a CNAME record to point to google.com.
- Select Other for the instructions so you can see your special code. Now we have to go back to HostGator for a moment.
- Login to cPanel and click the Advanced DNS Zone Editor icon.
- Select your domain name from the drop-down.
- Under Add a Record, fill in the following information:
- Name: googleffffffffc4ffb5fe.yourdomainname.com.
- TTL: 14400
- Type: CNAME
- Address: google.com
- Please note "googleffffffffc4ffb5fe" is an example, and you should instead use the special code provided to you by Google.
- Go back to the Google Apps page and click the Verify button. DNS settings can take up to 48 hours to propagate through the Internet. After completing domain verification, you can remove the CNAME record. For custom URLs, however, you must leave the CNAME record intact.
3. You can add a meta tag to your site's home page.
- Copy the meta tag below, and paste it into your site's home page. The meta tag must be pasted between the HTML head tags.
- <meta name="google-site-verification" content="Ztz_iwlwRZUu4F2Qjv3pOUJRbUZZusy8PmleQysc" />
- Please note "Ztz_iwlwRZUu4F2Qjv3pOUJRbUZZusy8PmleQysc" is an example, and you should instead use the code provided to you by Google.
- Save the changes to your page.
- Go back to the Google Apps page and click the Verify button. Leave the meta tag in place even after verification succeeds.
4. You can upload an HTML file to your website.
- Download the HTML file by clicking the this HTML verification file link.
- Upload that file to http://yourdomain.com/ . If this is your primary domain, the correct folder is public_html.
- Confirm successful upload by viewing the new .html file in your browser.
- Go back to the Google Apps page and click the Verify button. Leave the HTML file in place even after verification succeeds.
After you click the Verify button, allow up to 48 hours for Google to verify your are the owner of the domain name.
Meanwhile, you can continue using the Google setup guide to complete your Google Apps. Alternatively, here is a walkthrough for skipping straight to email setup.
Start using Google Email
At the Google Apps Dashboard, click the  Email link. You can change any of these settings as you see fit.
Email link. You can change any of these settings as you see fit.Click the link for Email activation Instructions on how to activate Email.
Read the instructions carefully. If your domain already has email addresses, you should create user accounts before changing your MX records.
1. Create user accounts
Click the "Create user accounts" link.
Enter a first and last name for the email user. Enter the name of his email address.
Click the "Create new user" button.
If you need to enter more emails, click the "Create another user" link.
Once finished, go back to the Dashboard tab at the top. To quickly get to the next step, click the Activate email link, located directly under the Email link.
Email link.2. Set up email delivery
If you skipped creating email users, then click the "Change MX records" link.
 Google reminds you to create the email users before you change the MX records, or you may have email downtime.
Google also offers you temporary email addresses, so you can use Google mail before the MX record change. The format is similar to name@yourdomain.com.test-google-a.com (The temporary email address will be deactivated once you change the MX records.)
You see "Showing instructions for" and a drop down box. Select "cPanel" as your hosting company. Follow the instructions.
Note: The steps are for the cPanel X theme; however, most HostGator clients are using the X3 theme. Here are the instructions for X3:
- Log in to your cPanel account.
- Click the MX Entry icon.
- Under Domain, in the drop-down box, select the domain name you are changing.
- Select the "Remote Mail Exchanger" option.
- Click the Change button.
- Paste the following combinations of Priorities and Destinations and add each one: (Be sure to remove the ending dot of each Destination so that cPanel will accept it.)
- Priority: 1 Destination: ASPMX.L.GOOGLE.COM
- Priority: 5 Destination: ALT1.ASPMX.L.GOOGLE.COM
- Priority: 5 Destination: ALT2.ASPMX.L.GOOGLE.COM
- Priority: 10 Destination: ASPMX2.GOOGLEMAIL.COM
- Priority: 10 Destination: ASPMX3.GOOGLEMAIL.COM
- Finally, delete the original MX record with Priority: 0 and Destination: yourdomain.com.
All done?
Be sure to go back to the Google Apps page and click the "I have completed these steps" button.
Accessing Webmail
Go back to the Google Apps Dashboard and click the Email link.
Email link.Next to Web address you see a sign-in address (URL) which is similar tohttp://mail.google.com/a/yourdomain.com .
The login is the email name WITHOUT @yourdomain.com and the temporary password given by Google. You can find the temporary password by going to the "Users and Groups" tab at the top. Click the email account in question, and the password will be revealed.